With a little elbow grease and ingenuity, you can have a cooler that matches your outdoor decor.
You most likely spent a lot of thought when deciding on decor for your outdoor space. Patios are no longer just “out back” and are thought of and outfitted as an extension of your home. A well-coordinated tailgate setup can look great, until the cooler makes it look like a campsite. Customizing a cooler can help boost the look you’ve worked so hard to achieve.
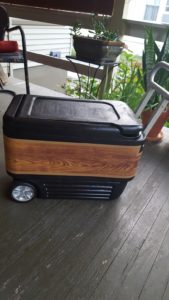
 Micki Margot, one of our own here at EP Henry, recently customized a standard Igloo cooler to take on the look of her dream car, an Iconic Jeep Wagoneer. Micki used paint and wood-paneled contact paper to mimic the Jeep’s traditional wood paneled siding. Here’s how Micki made the upgrade to her plain, reflex-blue cooler on wheels.
- Sanding. This dusty but necessary step allows the paint to adhere to your cooler much better. Sand with heavy grit paper first, then use a fine grit. Hand-sanding is a workout but using a palm sander makes it pretty easy. Rinse off all dust and dry thoroughly.
- Fill in the logos if your design requires painting or adhering images to depressed or raised logo area (this is optional). Painting over the logos works but your painted images may not be smooth. Use Bondo to fill in any divots or bumps. Let dry completely. Sand the Bondo with the same heavy then fine sandpaper. Clean off all dust from the cooler and let dry.

- Mask off with tape any places you do not want to paint, like the wheels and handles. Remove the lid and paint separately. Mask off inside of cooler.

- Paint the cooler with spray paint meant for plastic or acrylic paint. Let dry. This requires several coats. Let dry completely in between coats.
- If you are using contact paper for the sides like Micki did, measure your cooler and make templates out of paper bags or drawing paper. This extra step allows you adjust the size without the risk of ruining the contact paper. Check the template against the cooler. Once you are happy with the size and placement, trace a line around the template onto the back of the contact paper and cut. Remember to flip your template before you cut it out when it’s an irregular shape.

6. Apply the contact paper. Using a hard edge like a credit card, burnish the contact paper onto the cooler. Micki’s method: She peeled off a small start-strip at one edge of the paper. Once it was lined up she carefully pulled the backing off, burnishing as she went. (Micki’s trick: Apply a thin coat of ModPodge on the cooler, under the contact paper. It will help the paper stick better.) Then she went over all the contact paper again with the hard-edged card. Start from the middle and smooth out the paper in a cross then in a starburst direction. Always work from the middle pushing towards the edges to force any small air pockets out.
 7. To replicate the trim work on the Wagoneer, Micki used 1/2-inch tan duct tape to line the edges of the wood-patterned contact paper. Placing the duct tape half on the paper and half on the cooler will give the contact paper’s edges added adherence.
8. To get the look of the chrome wheels without having to have to tape off the tire, Micki constructed a tube out of cardstock that fit the rim’s circumference. Once she was happy with the fit, she shot some metallic silver spray paint into the tube. The whole process took about 5 minutes for both wheels. 
9. Seal the cooler. Micki used many layers of ModPodge to seal it. Sealing helps keep the paint, the contact paper and the trim intact by offering a little bit of waterproofing. Some ModPodge is meant for outdoor pieces. Make sure you use the outdoor version or a sealer that is designed to withstand outdoor weather. Micki used a sponge applicator brush for a smooth look.
10. You can also top the ModPodge layers with a high-gloss spray. As a final touch, Micki fashioned a little “luggage rack” for her cooler to help it match the Jeep’s rack using craft sticks, paint and glue. You can get creative, too. The fall weather is the best time to get outside and customize your cooler. The milder days makes working outdoors a breeze, and this is definitely an outdoor project. Cooler painting has become the must-do of tailgaters everywhere. Many “painted cooler” ideas and tutorials can be found on Pinterest and the web. The sky’s the limit on how you can customize your cooler to match the patio furniture, the house, the pool, your dream car or any of your outdoor decor.